This is one of those recipes that is rooted in the history of food and lets be honest who doesn’t love a cream tea. Clotted cream is incredibly hard to find in New Zealand and so I thought I’d share a couple of recipes that will get you started. It takes a long time to make so I’m sure it’s only a one off, but it is worth trying. There is also a cheat’s method to get a similar result at a fraction of the time.
This specialty of Devonshire, England (which is why it’s also known as Devonshire or Devon cream) is traditionally made by gently heating rich, unpasteurized milk until a semisolid layer of cream forms on the surface. After cooling, the thickened cream is removed. Since unpasteurized milk is not easily obtained, here is a recipe that comes close to the real thing. Clotted Cream can be spread on bread or spooned on top of fresh fruit or desserts. The traditional English ‘cream tea’ consists of clotted cream and jam served with scones and tea.
Clotted Cream
2 litres will net about 1 litre of clotted cream
Let the cream stand for 6 – 12 hours depending on time of year.
Cook cream in top of double boiler over simmering water until reduced by about half. It should be the consistency of butter, with a golden “crust” on the top. This will take a few hours.
Transfer, including crust, to bowl. Cover and let stand for 2 hours, then refrigerate for at least 12 hours. Check your fridge temperature as this needs to be cold.
Stir crust into cream before serving. Keep unused portions refrigerated, tightly covered, for up to 4 days.
Cheats Clotted Cream
200g Mascarpone
200ml cream
1teaspoon vanilla extract
1 – 2 tablespoons sugar
Zest of lemon or lime
Mix together and chill until needed
Strawberry Jam
This jam has a lower sugar content than the more usual 70% and therefore it is quite delicate and should be refrigerated after opening.
600g caster sugar
100g caster sugar with 30g dried pectin mixed in
1 kg ripe raspberries or hulled strawberries
juice of one lemon
Boil the fruit and 300g of the sugar covered for 5 minutes, remove the lid and boil for a further 7 minutes until the temperature reaches 100˚c, skim the foamy surface.
Sprinkle the surface with the remaining sugar, pectin and lemon juice. Stir and cook for a few more minutes.
Check for setting point and when ready pour into sterilised jars.
To get the longest life possible, place the filled jars, with their lids tightly on, onto a wire rack in a large pan of cold water (with the water almost up to the lids). Bring the pan to the boil gently and simmer for 20 minutes from boiling point. Remove from the water and leave to cool. Dry, label and store in a cool dark place. The jam keeps well for a year.
Scones
There are a couple of tricks to making good scones, firstly preheat the oven for at least 15 minutes to be sure that it is very hot and secondly keep the handling to the absolute minimum, that means no rolling pin and no pastry cutters.
450g sifted self-raising flour
175g very soft diced butter
pinch of salt
3 tablespoons of vanilla sugar
4 eggs lightly beaten
sour cream to taste
By hand bring together the flour and butter until it resembles fine crumbs. Add the salt, sugar, egg and any flavourings that you want (sultanas, dates etc), and bring together with your fingers (try really hard not to squeeze or knock the air out).
Now add the sour cream to taste, it should just hold together. Too much and the scones will spread in the oven and too little will make them heavy.
Gently smooth out to desired height, about 3 -5 cm, and cut with a sharp knife with out putting too much downward pressure on. Bake in a preheated oven at 225˚c for about 10 minutes. Transfer to a cooling rack and sprinkle with vanilla sugar
I don’t know if you are the same, but the half dozen tomatoes that we planted on labour weekend are now producing so much fruit that we can’t keep up. I have a freezer full of tomato sauces, soups and ratatouille, and still they keep growing. So now we are on to chutneys and ketchup.
The tomato wasn’t really accepted in northern Europe until late in the eighteenth century and much like the potato was feared at first due to its relationship to deadly Nightshade. Added to that was the lack of understanding as to its uses, which brings out the old quote “Knowledge is knowing that a tomato is a fruit; wisdom is knowing not to put one in a fruit salad”.
Initially it was always cooked and variously pulped for soup or made into a piquant pickle with vinegar and spices. The word ketchup comes from Chinese, meaning “brine of pickled fish” and refers to a sauce such as the Thai “Nam Pla”. Despite this confusion tomato ketchup has gained a world wide following. Ketchup is usually seen as the classic bought in one from Watties or Heinz, but there is nothing like homemade if you have a glut in the garden. Its flavour is fresher, with the spicy ingredients adding a new edge to liven up the whole experience and of course you are in control of the exact ingredients.
I’m not trying to compete with the Hawkes Bay institution, but we should try to make our own – at least once.
Homemade Tomato Ketchup
Makes just over a litre
2 cloves
2 bay leaves
1-teaspoon ground coriander
1 cinnamon stick
500ml cider vinegar or honeygar
200g soft brown sugar
3 kg prepared tomatoes (weigh them after you’ve discarded the seeds)
1-teaspoon salt
1-tablespoon English mustard powder
2-3 crushed garlic cloves
a good dash of Tabasco
a couple of tablespoons of tomato puree
Place the sugar and vinegar in a heavy based pan and bring to the simmer. Tie the spices in a bit of muslin, so that you can find them at the end.
Add the tomatoes and all the other ingredients and bring to the boil, stirring to prevent any sticking. Once up to the boil, reduce the temperature and simmer for 45 minutes, stirring occasionally (this has a habit of sticking to the bottom as the solids and liquids separate, so stirring keeps it all in suspension). Search for and discard the muslin bag and blitz in a food processor.
“Governing a great nation is like cooking a small fish – too much handling will spoil it.” (Lao-tzu, Chinese philosopher)
The basic Chinese cooking principle is to have everything prepared beforehand: the vegetables washed, drained well and cut, the meat cut and marinated and the sauces prepared. There should be an interesting variety of flavours, textures and colours; the Chinese believe in balance and harmony in every aspect of life, including food. And don’t worry if you don’t have the correct Asian ingredients; improvise as the Chinese themselves did when they immigrated to the USA in the 1800’s.
China has four distinctive styles of regional cuisine (although some might break this down further), based loosely on geographical area. Southern or Cantonese cuisine is the most well known, focusing on stir-frying, steaming and roasting a wide variety of meats, poultry and seafood. We also have the Cantonese to thank for dim sum, literally translated as “touch your heart” – the custom of feasting on a varied assortment of pastries and dumplings that originated in China’s teahouses.
In China’s northern regions, with its climate of hot, dry summers and freezing cold winters, people opt for more solid, nourishing fare. Instead of rice, noodles made from wheat, steamed dumplings and pancakes are popular fare.
The mountain-ringed provinces of Szechuan developed a cuisine of their own, heavily influenced by the foreigners journeying along the famous “Silk Route”. Buddhist missionaries introduced locals to Indian spices, with chefs making liberal use of Szechuan pepper (one of the ingredients in five spice powder).
The cuisine in Eastern China combines elements from all other regions, using both rice and wheat. The region is characterised by the liberal use of sugar to sweeten dishes, as well as “red-cooking” – where meat is slowly simmered in dark soy sauce, imparting a reddish tinge to the final product.
Stir-Fried ‘Velveted’ Chicken
This technique, passed on by Stephanie Alexander, ensures that stir-fried chicken has a lovely soft texture and it is so simple!
500 – 600g chicken breast fillets
1 lightly whisked egg white
½ teaspoon salt
1 tablespoon rice wine or dry sherry
1 tablespoon cornflour
1 tablespoon peanut or vegetable oil
Method
Mix all ingredients except chicken in a bowl. Cut the chicken into strips, add to bowl and mix well, then refrigerate for 30 minutes. Bring 1 litre water and 1 tablespoon peanut or vegetable oil to a boil in a wok or a wide frying pan, tip in the chicken and stir continuously for less than 1 minute until all the pieces look white. Tip the chicken and liquid through a colander and shake dry. Refrigerate if not cooking immediately.
Heat oil in a wok and stir-fry some aromatics (ginger, garlic, chilli, spring onions, garlic chives etc), toss in vegetables, then add ‘velveted’ chicken strips and any leafy greens. The chicken will take only about 1 minute to cook through.
Basic Recipe for Fried Rice
A basic recipe that other ingredients can be added to, but the number of eggs will then need to be increased to three.
1 – 2 spring onions
2 large eggs
1 teaspoon salt
Pepper to taste
4 tablespoons oil for stir-frying
4 cups cold cooked rice
1 – 2 tablespoons light soy sauce or oyster sauce
Method
Wash and finely chop the onion. Lightly beat eggs with slat and pepper. Heat a wok or frying pan and add 2 tablespoons oil. When oil is hot, add the eggs. Cook, stirring, until they are lightly scrambled but not too dry. Remove eggs and clean out pan.
Add 2 tablespoons oil, then add rice. Stir-fry for a few minutes, using chopsticks or a wooden spoon to break it apart. Stir in soy sauce or oyster sauce. When heated through, add scrambled egg back into pan. Mix thoroughly and stir in onion. Serve hot.
An aromatic wine like a gewürztraminer is perfect with this, try an Alan Scott Marlborough Gewürztramine
Fighting the so-called epidemic of childhood obesity and diabetes is now one of the most important issues facing our communities. Now I really don’t like the idea that our personal choices over what we eat can be described as an epidemic, that said I do believe that the “disease” is in the food processing industry.
In the old days of our youth when we visited Granny there would be a beautiful plate of homemade biscuits, we’d all have one and enjoy the moment. Today a packet of shop bought ones will appear and we eat the lot. It seems like a small change but the effect is so damaging, now instead of a small number of biscuits lovingly made with simple and pure ingredients, we have a complex chemical cocktail in very much larger quantities. So lets take a step back in time and go back to the lovingly simple, after all a little of what you like makes life so much more enjoyable.
Shortbread
Makes 16
225g sifted plain flour
110g fine semolina
110g caster sugar
225g softened salted butter
Vanilla sugar for dusting
Method
Put flour, semolina, sugar and butter into a food mixer and using the biscuit beater on SLOW speed beat until you have a soft dough. Roll out to 1cm thickness and cut into circles, squares or shapes with cookie cutters. Bake in a pre-heated oven at 170˚C for 30 minutes. Remove and transfer to a cooling tray and dust with vanilla sugar.
Chocolate Chip Cookies
350g plain flour
1/2 teaspoon bicarbonate of soda
1/2 teaspoon salt
115g unsweetened cocoa powder
3005 plain chocolate chips
225g dark brown sugar
115g soft demerara sugar
225g softened unsalted butter
3 large eggs
2 teaspoons vanilla essence
Method
In a medium bowl combine the first group of ingredients. In a large bowl cream the butter, sugar and vanilla. Scrape down the sides, add the eggs and blend well. Gradually fold the dry ingredients into the butter mix (do not over mix). Drop tablespoons of the dough onto a slip mat and bake in a pre-heated oven at 170˚C for 18 – 20 minutes. Cool on a wire rack and serve.
This is one of those wonderful salads that can be served hot and then sneakily popped in the lunchbox the following day to make you’re workmates jealous.
Israeli couscous is the one that looks kind of like the old pudding that we used to have at school and uncharitably called “frogspawn”, but trust me it is no relation. It is really a type of pasta and like all pastas takes flavours really well, in this case the chorizo and smoked Paprika add a Moorish heat that matches the season. When buying Chorizo be sure to check the chilli content equals your tolerance as some can be very hot and be brave with the smoked paprika, it brings the Spanish edge to the whole dish.
Israeli Couscous Salad with Chorizo & Spanish Smoked Paprika
250g Israeli couscous
1 medium onion, finely diced
1 cup pesto dressing
250g (about 2 large) chorizo sausages, sliced and pan-fried
100g sun-dried tomatoes
1 cup cherry tomatoes, cut into halves
100g red capsicums, de-seeded, char-grilled and roughly sliced
1/3 cup Italian flat leaf parsley
1 cup whole olives
Salt & pepper to season
Pesto dressing:
1 cup sun-dried tomatoes
1 cup toasted pine nuts
1 tbsp lemon juice
½ clove garlic, crushed
½ cup grated parmesan
½ cup fresh basil
2 tbsp smoked paprika
1 cup olive oil
Method
Blend pesto ingredients, set 1 cup aside and refrigerate remainder to use on another occasion. (Will keep for up to 2 weeks in fridge.)
Heat a little olive oil and fry onion until translucent. Add the couscous and brown on all sides. Season with salt and pepper and add boiling water to cover. Cover the pan and simmer for 8 to 10 minutes, stirring once or twice. Drain.
While couscous is still warm mix with pesto, then fold through the rest of the ingredients, season to taste and serve, sprinkled with chopped Italian parsley.
As the autumn starts to kick in we need to use up and preserve the late season harvest, or if you garden has already given its best then buy while the prices are still cheap and local. Very soon you’ll notice that capsicums will shoot up in price as we start buying out of season, imported ones.
This dish is a truly wonderful light vegetarian meal or as an accompaniment to an autumn BBQ, but don’t let it stop there. If you make more than you need, then once they are cold blitz them in a food processor and freeze in suitably sized containers. What you have is a perfect and healthy sauce for pasta or lamb that will remind you of the freshness of summer during the long nights of winter.
Just a quick note on using anchovies, for those of you that truly hate them then by all means leave them out, they are not there to make the dish fishy but to add a kind of maritime saltiness without lifting your sodium count. Like many times in Mediterranean food, anchovies are used as a seasoning rather than a core flavour, so if you’re not sure why not just give them a try, you won’t be disappointed.
Roasted Red Peppers
So easy! – Serves 2
2 red peppers
4 medium plum tomatoes, skinned and quartered
4 anchovy fillets
1 clove garlic
1 tablespoon extra virgin olive oil
Freshly ground black pepper
Basil leaves to garnish
Method
Cut peppers in half and remove seeds, leaving stalks intact. Lay peppers on an oiled roasting tray and put the quartered tomatoes in them. Sprinkle with chopped anchovies and sliced garlic. Drizzle olive oil over each pepper and season with black pepper. Place on a high shelf in a pre-heated oven at 180˚C for 30 minutes. Garnish with basil and serve.
happens-your-appliances-stop-working-video-5409377broken-camera-update-video-5416849
You know winter’s coming when you start craving the comfort foods, partly because the heavy and rich are what our bodies need as the temperature drops and partly because the longer cooking times fill the home with the warm aromas of tasty expectation.
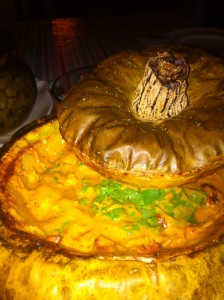
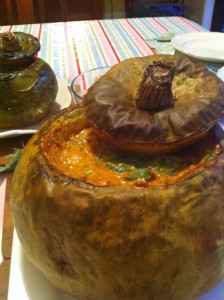
This recipe is my take on a Latin American Creole dish, which is basically a meat casserole served in a whole precooked pumpkin. Retro I know but trust me it looks so cool in the centre of the table when it’s dark outside and the fire’s been lit.
The food world is now so fashion conscious that we all seem to lurch from one fad to another, without actually looking at the food culture origins that we are trying to use. The best example of this is the bazaar idea of Pacific Rim cooking, a fashion so fleeting that we’ve moved on already, to be honest only Peter Gordon ever really nailed it, for everyone else pacific rim was an excuse to just throw more stuff on the plate. So if fashion has moved through the old world and Asia, where to next? The answer is South America, the new shining star of global gastronomy.
Carbonada Criolla
Ingredients
Serves 8
1 pumpkin, washed and scrubbed (about 5kg)
olive oil
1kg beef or veal, trimmed and large diced (about 2cm)
3 cloves garlic, crushed
2 onions, chopped
2 small green peppers, sliced
1 large celery stalk, chopped
1 green chilli, finely chopped
875ml beef stock
Bouquet garni
3 tomatoes, skinned deseeded and chopped
3 potatoes, peeled and diced
2 small kumara, peeled and diced
2 corn cobs, husks removed and cut into 2cm discs
3 small courgettes, washed and sliced
2 apples, peeled, cored and cut into wedges
Method
Preheat oven to 180˚C
Choose a pumpkin with a decent stem on it as this will serve as a handle in the lid. Cut the top off the pumpkin to form a lid and scoop all the seeds and stringy bits out. Put the lid back on and bake for 1 – 1½ hours or until tender but still firm. Once cooked scoop a little more of the flesh out to give enough space for the casserole being careful not to damage the outer layer and skin.
Meanwhile heat a few tablespoons of olive oil in a large pan and brown the meat on all sides. Remove the meat and set aside. In the same pan, adding more oil if necessary, fry off the onions, garlic, celery, capsicum and chilli until soft. Pour in the stock and bring to a simmer. Return the meat to the pan, add the tomatoes, bouquet garni and seasoning to taste, cover and cook gently for 45 minutes.
Add the potatoes, kumara and corn to the pan and continue to cook for 15 – 20 minutes. Add the courgette and apples and continue to cook for a further 15 minutes.
Spoon the casserole into the pumpkin and bake in the oven for a further 20 minutes.
Carefully place the pumpkin on a serving dish and fish out the bouquet garmi before serving.
Try a big, heart warming red with this. The Celebre from Ata Rangi is well up to the task.
Happy New Year to all, I hope you had a wonderful time and the transition back to reality isn’t too painful. For us we had the pleasure of spending Christmas and New Year with a wonderful family of expat Kiwis who now live in the Basque region of France. We had so much fun playing with traditional French cuisine in the glorious setting of Waihi beach that I thought I’d share this recipe with you.
Now I know what you’re thinking, I too used to view snails on a dinner plate with squinty-eyed skepticism – for all the usual reasons I suppose – their sliminess, their squelchyness, the havoc they wreck in the garden. So it would be safe to say that I was no great fan of the snail in any way, shape, form or location up until reluctantly trying them in France in a delightful country bistro many years, when I experienced a minor gastronomic epiphany.
They don’t have to be slimy rubber bands slathered in butter and garlic, they can be exquisite, delicate and exciting. Now the snails that we ate over the festive season were of the precooked, in a jar variety. Which is always a bit of a risk but got me thinking about New Zealand and with a bit of research, I can’t find anyone that is organically farming them here, except for Silver Trail Snails in the Hawkes Bay who have sadly recently stopped.
So what to do, should we just forget about a piece of culinary genius or should we expand our minds and shock our friends by trying something different, I think you already know my answer to this, and who knows we might even encourage someone to start farming them.
Escargot a la Bourguignonne
Cooking Liquor
½ L white wine
½ L chicken Stock
3 shallots
1 carrot
Large Bouquet Garni
Pinch of salt
50 shelled snails
50 snail shells
4 tablespoon soda
4 L water
Buerre de Escargot
35g shallots, finely chopped
2 tablespoons finely chopped Parsley
2 Cloves Garlic, crushed
350g butter, softened
large pinch of salt
freshly ground Pepper
Method
Simmer the shelled snails in the cooking liquor for about 8 minutes then leave to cool in the cooking liquid.
Meanwhile, boil the empty shells in the water and soda for five minutes, drain and wash in plenty of clean water, then dry in the oven without letting them colour.
Mix all the butter ingredients and pop a small amount in each shell, then add a snail and a little more butter on top. Place on snail plates or an oven tray covered in rock salt (to hold them upright) and heat in the oven without letting the butter brown and serve piping hot.
If you are using precooked canned snails then cut the simmering stage
Wine
For me a good complex Chardonnay hits the mark here, Try the Octopus Label 2011 Wild Chardonnay from Karikari Estate Wines, the most northerly vineyard in New Zealand.
I happened to be in Sandfords the other day to buy some Yellow Fin Tuna, sadly a rarity since most of our best fish seem to find their way onto an plane these days. Where foods concerned I think the French attitude of eat the best, export the rest is maybe a better option.
Anyway, to get off my soapbox for a minute, while I was there I noticed that there was some perfect looking Blue Nose winking at me. Blue Nose is that piece of fishy perfection that becomes pure white as it cooks and handled correctly has a great firm texture, to me it is one of the prime fish.
Now to the herb crust, what we are looking for here is a smooth herby green coating that hugs the surface of the fish almost like a carpet. The trick is to put the crust on the fish just moments before it goes in the oven and while the crust is still frozen, that way it will defrost then cook without breaking apart. Try using different herbs if you wish, or maybe some lemon or lime zest, the trick is to create the flavour that you like. As a total aside, I also love the herb crust method with racks of lamb, use the same technique but add rosemary and green olives to the food processor.
Fillet of Blue Nose with a Soft Herb Crust and a Champagne and Chive Sauce
Serves 8
8 Fillets of Blue Nose, skin off
1 glass white wine (optional)
Soft Herb Crust:
175g fresh white breadcrumbs (preferably brioche)
80g Gruyere cheese, grated
50g chopped fresh parsley
5g chopped fresh thyme
125g unsalted butter, softened
Seasoning
Champagne & Chive Sauce:
3 shallots (or 1 medium onion), finely chopped
¼ leek, finely chopped
1 clove garlic, crushed
1 tablespoon olive oil
300ml champagne or white wine
300ml fish stock (or chicken stock)
3 tbsps fresh chives, chopped
300ml double cream
Lemon juice to taste
Seasoning
Method
Place all the ingredients into a food processor and whiz until thoroughly mixed. Spread out onto a greaseproof lined tray and open freeze. Cut into portions and place one on top of each seasoned fillet of blue nose. Place on baking tray, pour wine onto baking tray (optional) and bake at 180˚C for 10-12 minutes or until topping is slightly golden and fish is firm to the touch and opaque.
Meanwhile prepare sauce: sweat shallots, leek and garlic in the olive oil. Add stock and champagne to the pan and reduce to quarter of original volume. In a second pan, reduce cream to half the original volume. Add stock mix to cream and hand whisk. Add lemon juice, chopped chives and seasoning to taste.
Wine Match
Ata Rangi wines from Martinborough are famous for their world beating Pinot Noir, but don’t ignore their 2012 Sauvignon Blanc as it is superb.
